Exams can be used in several ways within StaffSavvy. They are a completely stand-alone entity so they can be used to pass a training module, required to be passed as part of a Step List, assigned as a Skill requirement or be assigned to a staff member at any time via the Assign Exam page.
Managing exams
To create and manage exams navigate to Training > Exams > Manage Exams. This will take you to a page with all the current exams in a listed format.
Categories
To help organise exams, they can be placed into categories. These are simple text titles that will group all exams with the same text title together. You can add to and create categories by clicking the More button next to each exam.
Versions
Exams have a full version control system. This means that you can make changes to an exam before publishing it. Only published exams will be taken by staff members.
Staff will always take the latest version of an exam and records of past exam versions are always maintained. You are able to see the exact answers a staff member gave to each question as they were at the time they took the exam.
To edit an exam, you must create a new draft. If an exam is published then you will only be able to edit an exam when you have created a new draft, and you will see the live version will still be the version you have previously published. The new version is a draft which you can edit and will become live once you re publish the exam. For example, the first time you publish an exam it would be LIVE VERSION 1, then when you select create a new draft, the live version would still be LIVE VERSION 1, (which appears in a green bubble) but you would also see DRAFT VERSION 2. You can then make changes to this draft version click save, the draft would go away and you would only see LIVE VERSION 2. This new, edited version will now be the one staff will take.
All of the options and configuration settings on an exam are linked to the version they made with. Any changes to the title, information or pass mark will be contained in the new version.
Now we have gone through how to manage exams, we will go through how to create an exam and the options available.
Exam Options
Details
You can create a new exam by clicking Create Exam from the actions menu from the Manage Exams page.
From here you can set up the details for your exam which include, creating a title, setting which departments have access to assign the exam, providing a short summary about the Exam which will before the exam starts. You can also add introduction text, which is any text you want to appear before the first question. You can also add a section of text to appear once the staff member has completed the exam. Note that they could have passed or failed the exam.
Pass requirements
Once you have set your general details, you will need to consider your exam marking requirements.
-
Automatically Pass/Fail
This option means that a staff member can automatically achieve a pass mark without needing a marker based on just their answers.
This can be ‘on’ for multiple choice exams (where there are are definitive right or wrong answers) and ‘off’ for exams with text answers that need marking. -
Who can score the answers
This option decides which access levels are able score this exam. -
Auditing
This allows another access level to review the scores provided and make changes before confirming a pass/fail. If ‘on’, you need to select the access levels who can do this. -
Score or Percentage required to pass
There are two options on how to mark the exams. Either it can be a percentage of the total marks available or a fixed score. -
Allow staff to retake the exam?
When set, staff can retake the exam this number of times without manager intervention. Each of the failed exams are stored for review if needed. -
Retake all questions
This option allows staff to only answer the questions they got wrong previously. Staff are shown the question and the correct answer before continuing through the questions. -
Active
Allow the exam to be assigned out to staff.
Question Management
Once you have confirmed your exam details you can start adding questions to build your exam.
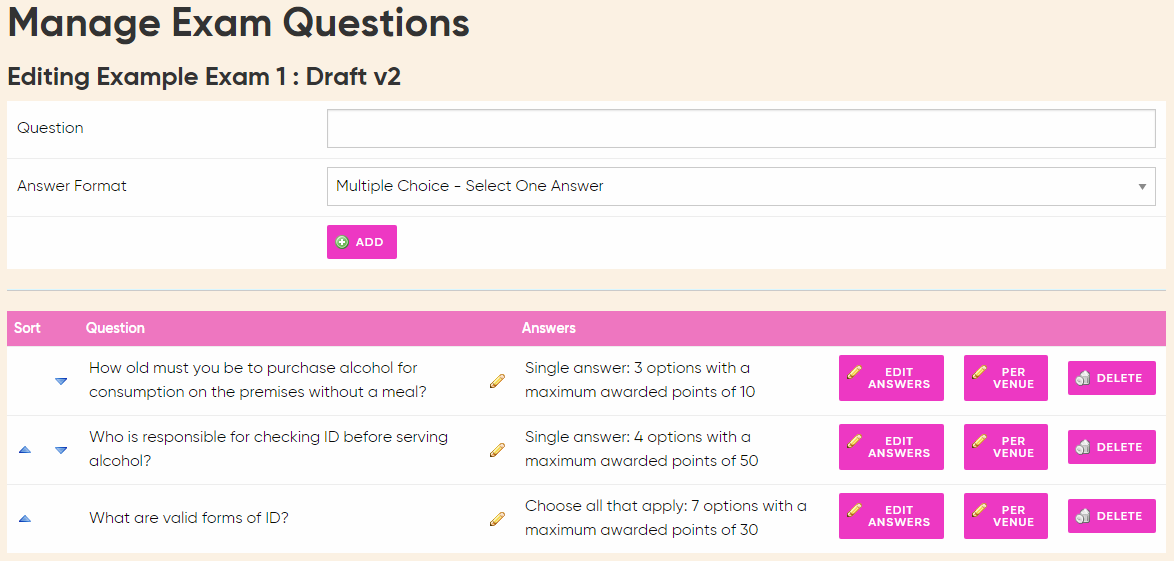
Adding a Question
First go to Edit Questions, (next to Edit Details) and then simply enter the text for your question in the question box and choose a format for the answers.
- Multiple Choice (Select One Answer) - You provide as many answers as needed and the staff member must select one of them. Each answer can contain different points so selecting a mostly right answer can provide some points but the perfect answer can grant more points.
- Multiple Choice (Choose all that apply) - You provide as many answers as needed and staff can choose all of the answers that they believe apply. Each answer can have different points so incorrect answers can provide zero points (or even negative points). Correct answers can all carry the same number of points or different amounts as needed.
- Short Test Answer - This will allow the staff member to type a short answer to the question.
- Long text Answer/Essay Answer - This will display a longer text area where the staff member can answer the question with basic formatting too.
Adding & Editing Question Answers
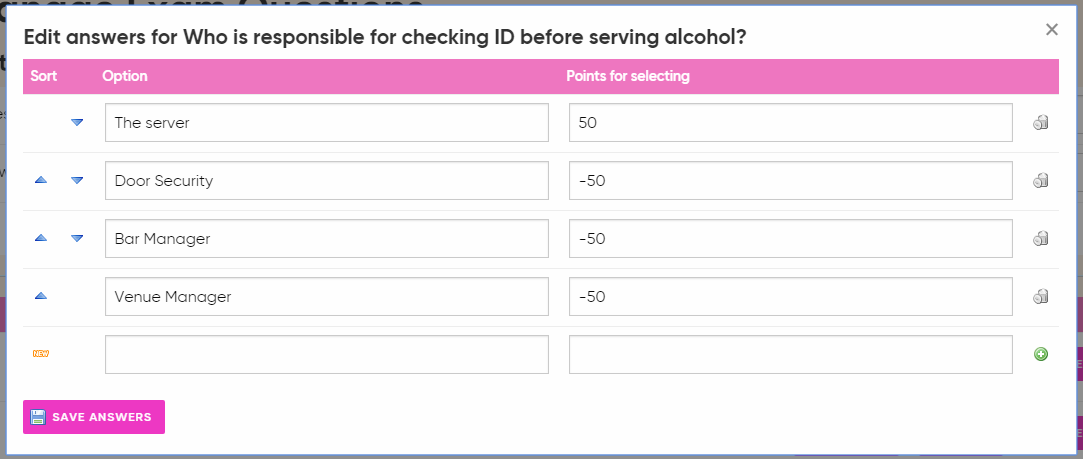
Existing answers will be listed on the page. You can update the answer text and the points by editing them and clicking Save Answers.
To add a single new answer just enter it in the bottom box (with NEW icon to the left hand side) and click Save Answers. You can add multiple new answers by entering the text for the answer and then clicking the green plus icon to the right of the row. This will then add another answer. This can be repeated as needed. When finished, click ‘Save Answers’ to complete the update.
You can re-order the answers using the blue arrows.
Marking
For multiple choice questions
The marking scheme can be as simple or as complex as you need.
The simple method is to simply award 1 point for each correct answer and 0 for all incorrect answers. Then set your pass mark as a percentage on the whole exam.
To give weight to answers, you can give more points to correct answers. You can also mark answers with a negative score. This allows certain questions to be an automatic fail for the whole exam.
For text answers
You can provide details for the maker on how this question should be marked under the Marking Notes button. This will be available to the marker when they are reviewing the answers.
You also need to set the maximum number of points available.
Once the exam is complete, a notification will appear on the dashboard for the marker. Clicking this will display a list of the exams they can score and audit.
Once a score is provided and confirmed by a marker, the exam might be passed for auditing. Here another staff member will review the answers and scores provided and confirm or adjust the scores.
Both markers and auditors are able to put internal feedback on each question to explain their decisions.
Answers Per Venue
This feature allows the question and answers to be bespoke for certain venues within your organisation. This allows for relevant answers to be shown to staff while still using the same exam and same marking scheme.
Note; only the text can be edited. The number and scores on each answer cannot be changed and all questions will be asked to all staff.
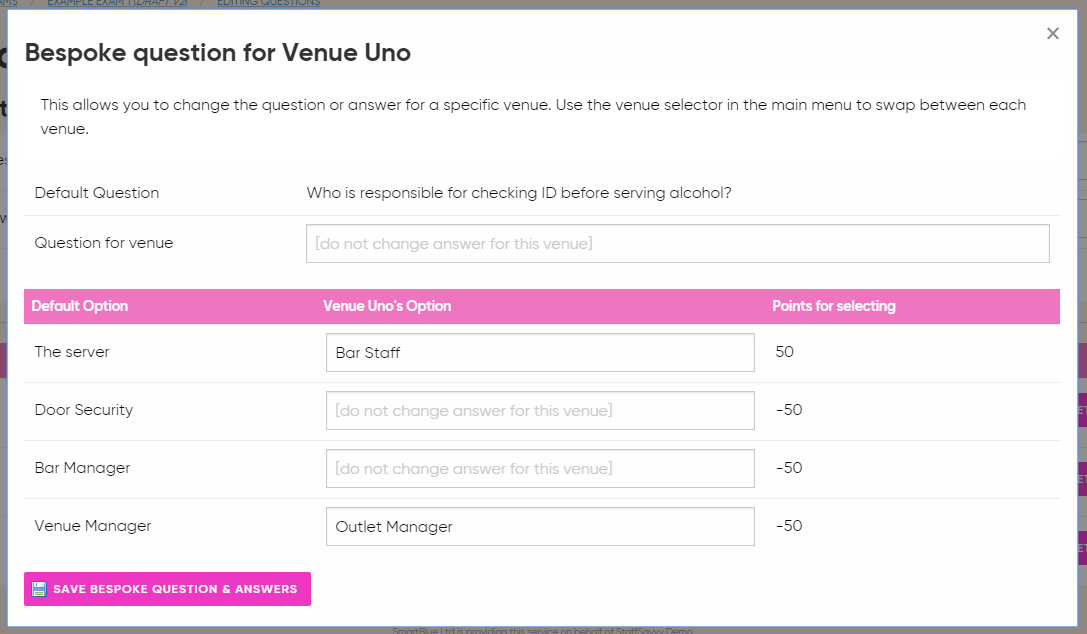
To change the text, simply enter new text and click Save. To remove the bespoke text for this venue, simply delete everything from the text box and click Save.
Note: the venue switcher in the top right of the screen chooses which venue you are editing the text for. To edit multiple venues simply edit the first, click save. Then change venue using the venue switcher in the top right and edit the answers again.
Comments
0 comments
Please sign in to leave a comment.